How to Tune a Nitro RC Engine
Tune your nitro RC engine's carburetor with this step-by-step guide, packed with the best tips and none of the headaches.
By Elite Radio Control teamUpdated 18 min read
Part of the guide: Nitro and gas RC cars
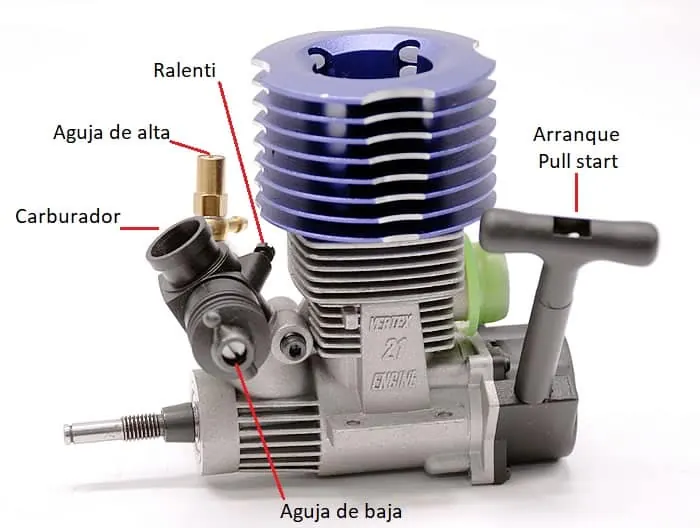
Tuning a new nitro RC engine can look like a tough, complicated job at first. What you need most is a calm head and patience, because making random adjustments without knowing exactly what you’re changing can shorten the life of your new engine’s parts.
That’s why it pays to follow the series of steps laid out in this guide, which will help you tune your nitro RC engine, with directions and recommendations along the way. Without further ado, let’s get to work!
Gear you need to work on a nitro engine
Below is a list of the items and RC tools we suggest having on hand so you can start tuning your nitro RC engine without any trouble.
- Glow plug igniter (glow plug heater)
- Glow plugs
- Nitro fuel suited to your car
- Fuel bottle
- Small Phillips screwdriver and a flathead screwdriver
- Spare caps
- Air filter oil
- Starter box and 12-volt battery for engines without a pull starter
- A 5/16 in wrench or a glow plug wrench
How do you tune a nitro RC engine?
Before you start tuning your nitro RC engine, you need to know a few concepts related to the job and to the engine’s essential parts.
Nitro engine idle
The idle screw sets how far closed the carburetor can go. It controls the engine’s RPM in neutral, that is, when you’re not giving it any throttle, and it keeps the engine from stalling suddenly when you brake.
High-speed needle
It sets the proportion of fuel entering the carburetor at every throttle position, but above all it controls the amount of fuel at mid-to-high and high RPM, hence its name.
Low-speed needle
It only controls the amount of fuel mixture entering the carburetor at low and mid RPM.
The RC engine’s carburetor
The carburetor’s job is to deliver exactly the right mix of air and fuel to the engine.
That’s why adjusting this component is known as tuning the carburetor: you’re changing the ratio of the fuel/air mixture entering the engine.
The nitro engine’s throttle
You control it with your transmitter. It regulates the engine’s RPM and is linked to the throttle servo. There are two types of throttle: slide and rotary.
On most engines, the high-speed needle and the idle screw sit upright, while the low-speed needle is on the side of the carburetor.
Fuel for your nitro RC engine
The right RC fuel is key to a long engine life. The wrong fuel can cause hard starting, poor performance and excessive wear on engine parts. Fuels recommended for RC cars include:
- Blue Thunder
- Trinity
- Byron Original
- Traxxas
There are many racing fuels available, but they need to meet a few requirements:
- The fuel should contain castor and synthetic oils.
- Try to keep the nitro (nitromethane) content between 10% and 20%.
The best fuels also contain corrosion inhibitors, anti-wear agents, anti-foaming agents and lubrication additives.
IMPORTANT: DO NOT use any kind of model airplane fuel. Airplane fuels may not have the oil types and ratios RC cars need.
RC fuel bottle
To fill the tank easily, it’s best to use a small bottle with a dispensing tube and a cap. That keeps the fuel from evaporating or getting contaminated.
Nitro engine glow plugs
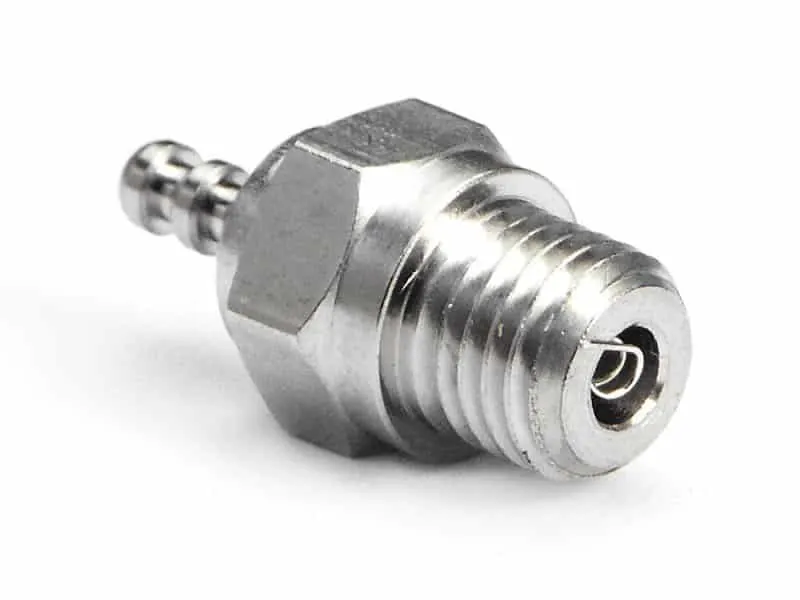
The glow plug’s job is to ignite the fuel inside your nitro engine.
It’s best to use a new plug, or at least one with no defects; otherwise, it will cause problems in your RC engine.
Those problems include stalling in the middle of a race, hard starting and so on.
Tuning and starting your nitro engine
Here we’ll focus on tuning and starting your nitro engine, and we’ll also explain how to run the first tanks of fuel to get the tuning right without damaging the engine.
Keep in mind that this is a very important point, and it will directly affect the life of the engine you’re working with.
Before starting your nitro RC engine
The first start is the most critical moment in an engine’s life, because it sets how the engine will run from then on. That’s why we’re giving you a detailed guide on how to tune and set up your new nitro RC engine.
Setting the high-speed needle
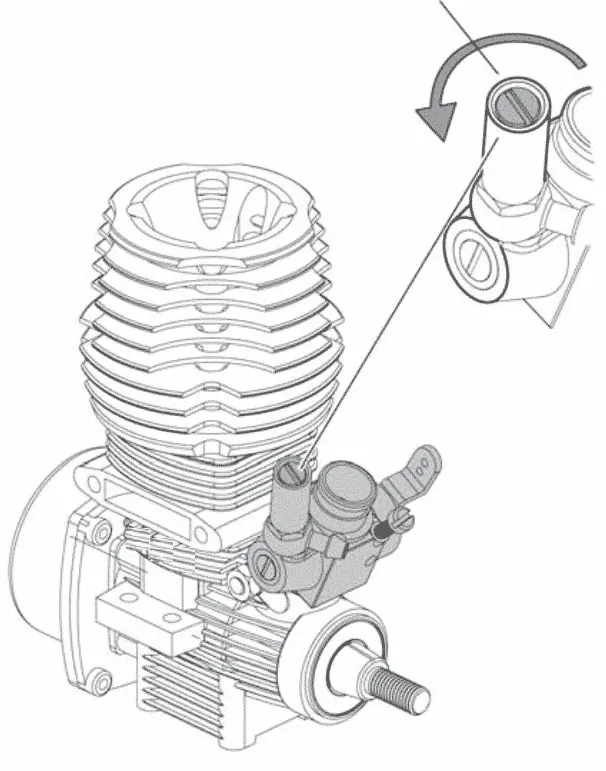
The high-speed needle controls the amount of fuel entering the engine at mid and high speeds.
Turn the high-speed needle clockwise until it bottoms out. DO NOT overtighten it.
Now turn the needle counterclockwise 2 1/2 turns to set it correctly.
Setting the low-speed needle
This screw meters the fuel entering the engine when it runs at low speeds. The low-speed mixture screw is located at the end of the carburetor, inside the throttle arm.
It controls how much fuel enters the engine at idle and at low throttle. This adjustment smooths out the idle and improves mid-range acceleration.
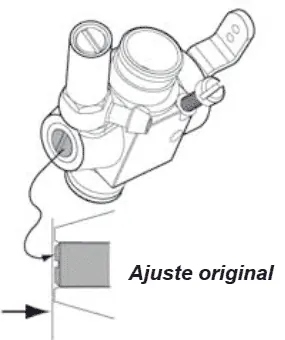
Make this adjustment with the throttle closed, after setting the idle. Gently turn the screw clockwise until it bottoms out. Again, DO NOT overtighten it.
Now turn the low-speed needle counterclockwise 2 to 2 1/2 turns to finish the adjustment.
As the image shows, to return to the original setting you can turn the screw until it’s flush with its housing, and then follow the instructions from there for a correct setting.
Setting the nitro engine’s idle
The idle screw sets how far the throttle stays open to control the idle speed. Set the throttle opening at idle as shown in the image below.
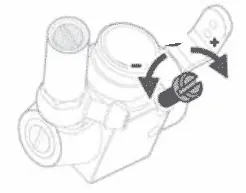
Turn the screw until the opening inside the carburetor is about 1/32 open, that is, just barely open.
The idle speed may need to be readjusted once the engine is warm.
Filling the RC car’s fuel tank
First squeeze the fuel bottle, then put the bottle’s tube into the fuel jug and draw some fuel in.
Next, open the cap of the car’s fuel tank and slowly squeeze the bottle until the tank is full.
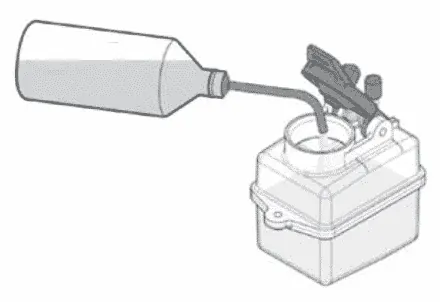
Be careful during this step: if the tank overflows, fuel can drip onto the radio gear or the brakes and make the car unsafe to drive.
Always keep the fuel bottle closed when you’re not using it.
IMPORTANT:
The exhaust should always smoke at full throttle. If there’s no smoke, the mixture is too lean and you can damage the engine. During break-in, it’s also normal for the exhaust to spit out some fuel.
How do you start a nitro RC engine?
Ideally, use the starting method recommended for your RC car’s brand and engine.
Step one
First, know how to stop the engine: cover the exhaust outlet with a rag. The exhaust can get very hot, so use a thick rag.
In an emergency, pinch the fuel line going to the carburetor to stop the engine. Be careful, because this makes the engine run very lean and you could damage it.
The best way to stop the engine is with a rag, as described above.
Step two
Turn on your RC car and the radio system, and put the glow plug igniter on the glow plug to start the engine.
Step three
If your engine doesn’t have a pull starter, you’ll need another method to start it, such as a starter box. If it does have a pull starter, start it that way.
If the engine still won’t start, it could be due to one of the following:
- a problem with the glow plug.
- a problem with the glow plug igniter.
- the engine could be flooded.
With that in mind, go back and check these points to fix it.
Tips for nitro pull starters
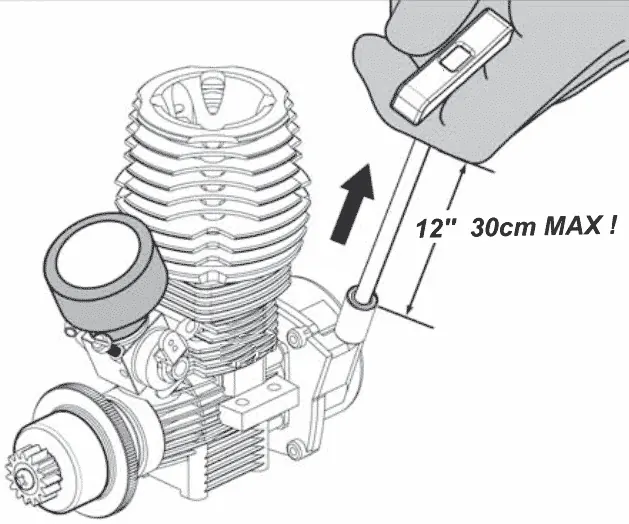
Never pull the cord out to its full length; doing so can damage it and the cord may not retract.
Quick, short pulls on the starter cord are the best technique for this type of starter. DO NOT pull the cord out more than 12 in (30 cm).
Don’t let go of the handle abruptly. Let the cord rewind smoothly while you still hold the handle.
Pull the handle straight out when starting the engine so the cord doesn’t rub against the body or the engine.
That helps keep the cord from being damaged by abrasion or engine heat. Try not to spill fuel on the starter unit and its cord.
Some fuels have a damaging, corrosive effect on these parts.
Before you start driving
The key to fully understanding how your engine runs is patience. While a nitro engine is being broken in, the car may seem to run poorly, with problems such as bogging or sudden stalling, inconsistent performance and burned-out glow plugs. Don’t give up.
These are just some of the things that can happen during your first runs with the car. Just keep it running, and squeeze and release the throttle as gently as you can.
Sudden changes on the throttle trigger will make the engine stall. Shortly after this first tuning session, your patience will be rewarded with an engine that runs well.
Nitro engine fuel
During tuning, use fuel with the same nitro percentage you plan to run normally.
The engine’s performance will be limited by the fuel you use throughout the break-in process.
Once the nitro RC engine is fully broken in, the mixture will work better, increasing speed and acceleration.
Because of the fuel mixture and the wear of new parts, deposits will build up on the glow plug and make it fail.
This is normal, and you can expect to replace the glow plug during break-in, and definitely once the engine is fully broken in.
What “rich” and “lean” mean
The carburetor has screws, or “needles,” that regulate how much air and fuel enter the engine together: the air/fuel mixture.
The mixture is too “rich” when there’s too much fuel, and a mixture that’s too “lean” means there isn’t enough fuel for the amount of air.
When the mixture is too rich, performance will be sluggish (one symptom is excessive smoke from the exhaust). A very rich mixture can also burn out the glow plug.
When the mixture is too lean, there isn’t enough fuel to cool and lubricate the engine’s internal parts, and damage to the engine and/or the glow plug is almost certain.
Turn the high-speed needle clockwise to adjust the mixture. This reduces the fuel flow for a given amount of air.
Turn it counterclockwise to increase the amount of fuel mixed with the air.
Precautions for your nitro RC engine
If the engine stalls from overheating while you’re driving, severe damage may already have happened.
Overheating can be caused by any of the following:
- The air/fuel mixture wasn’t set correctly (high- and low-speed needles)
- An air leak around the carburetor
- No air filter
- Too much nitro in the fuel
- The wrong oil content in the fuel
- Poor-quality fuel
- Contaminated fuel
Your engine won’t last long if any of these conditions are allowed to continue for a long time.
Tips for running your nitro engine
From the first through the fourth tank of fuel, watch the engine closely for any sign of overheating.
These signs include:
- Steam or smoke coming off the engine’s surfaces
- A delay when accelerating at high speed, as if the car were running out of fuel
- A clattering or rattling sound when slowing down
- An idle speed that rises, or possibly drops to the point of stalling
Overheating test for a nitro RC engine
It’s important to check the maximum temperature while the engine is running. The best way to check it is with a temperature gauge.
There are several temperature gauges available, and readings vary from brand to brand. Because of that variation, readings will range from about 210 °F to 240 °F (100–115 °C).
If you don’t have a temperature gauge handy, you can use water for the check by placing a drop of water on the cylinder head.
If it vanishes immediately, shut off your engine. If it takes about 3–5 seconds for the drop of water to boil off, the engine is running at a normal temperature.
The first two tanks of fuel
Step 1: The high- and low-speed needles should already be set as described above in “Setting the high-speed needle” and “Setting the low-speed needle.” For the break-in procedure, however, the engine should run richer than those settings.
Turn the high-speed needle counterclockwise 1/4 turn from its previous position to richen it.
Step 2: Start your engine. Once it’s running, apply throttle slowly to warm it up.
If the engine keeps bogging when you accelerate, turn the high-speed needle 1/8 turn counterclockwise. Set the idle as high as possible without making the car move. If needed, you can adjust the idle screw as described above in “Setting the nitro engine’s idle.”
Correct tuning for a nitro engine
Step 3: The standard high-speed needle setting varies slightly from engine to engine.
You’ll know your engine is set correctly when you see the following performance traits (on a warm engine):
- The engine accelerates slowly from a standstill and may even try to stall if you apply the throttle too quickly
- Blue-white smoke comes out of the exhaust
- Ideally, never go beyond half speed, since the engine is still very new at this stage of break-in
- As the engine reaches normal operating temperature, it speeds up and performance improves
This happens because the fuel mixture gets leaner as the temperature rises.
Step 4: When the first tank is nearly empty, stop the car and shut off the engine. Let the engine cool for 8 to 10 minutes before starting it again. Add more fuel.
Then start over and run through a second tank of fuel. Again, let the engine cool before running it again.
The third and fourth tanks of fuel
Step 5: Turn the high-speed mixture needle clockwise (less fuel) 1/8 turn and run the car through a third tank of fuel. Repeat this step for the fourth tank.
That completes the engine break-in procedure. Now we can move on to the next part.
Tuning your nitro RC engine
Proper tuning is key to getting the best performance from a nitro RC engine. To help you cover every point, below you’ll find basic tips and a checklist so you don’t forget anything.
For maximum nitro performance
Somewhere between the fourth and sixth tank of fuel, the engine’s internal parts should be seated and broken in.
From then on, you can start adjusting the fuel mixture to maximize performance for your driving needs. As you keep leaning the fuel mixture, the engine will run faster, up to a point.
When the nitro RC engine is set too lean, it will seem to run stronger at first, but it will bog, hesitate or sputter when running at high speed. The engine will also overheat quickly when the setting is too lean.
That’s because the fuel provides the lubrication, and lubrication is inadequate when the setting is too lean.
ALWAYS CHECK THE ENGINE TEMPERATURE WHEN YOU ADJUST THE NEEDLES. DON’T LET THE ENGINE OVERHEAT.
You should always see smoke coming from your RC car’s exhaust.
At the optimum setting, the engine will run clean. It will have a loud, high-pitched scream at full throttle, and there will be a thin trail of whitish smoke from the exhaust. It’s always better to set the engine a little rich than too lean.
Speed testing an RC car
Try to find an area with a long straight where you can let the engine run at full speed. Make two or three full-throttle passes and watch how the car performs.
Turn the high-speed mixture needle clockwise 1/8 turn and test the car again, once more noting how it performs.
Keep adjusting the mixture and retesting the RC car until it reaches its highest speed. At that point, turn the mixture counterclockwise 1/16 turn. That’s the optimum setting the engine should run at.
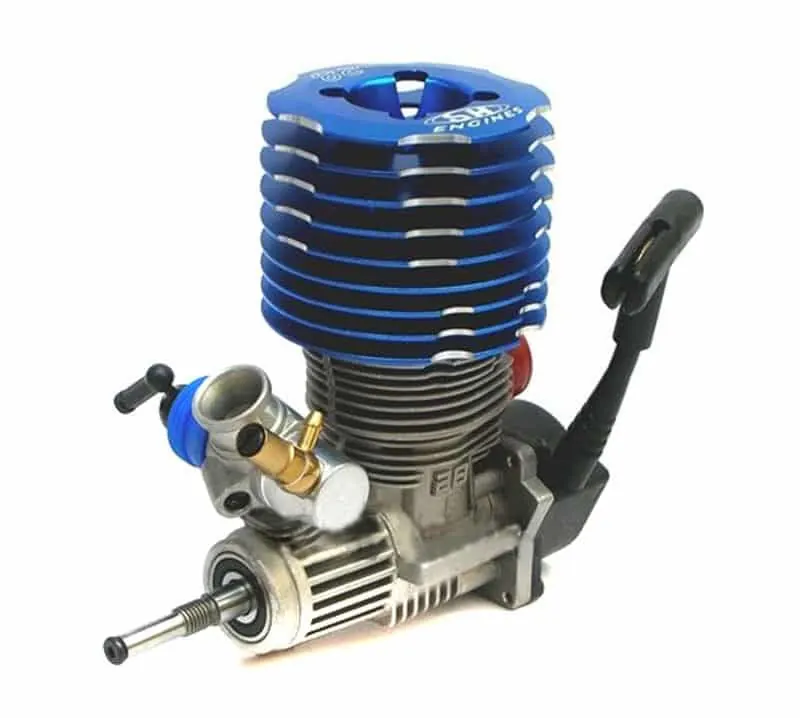
If the engine stalls under acceleration, starts to bog or loses top speed, or if there’s less smoke from the exhaust, the engine is running too lean.
Immediately turn the high-speed mixture needle counterclockwise 1/4 turn and drive the car at medium speed for 1 to 2 minutes to let the engine cool. Then continue testing.
For low-speed performance
The low-speed mixture affects how the engine runs in the low-to-mid RPM range. Turning the low-speed needle clockwise leans the mixture.
As with the high-speed mixture, leaning the low-speed mixture increases performance.
Again, if the mixture is too lean here, the engine can be starved of lubrication in the low and mid RPM ranges, which causes overheating and excessive engine wear.
Testing the nitro engine’s mixtures
You can run the following test to find out whether the low-speed mixture is set correctly.
With the engine warm and running, let it idle for about 15 seconds. Then quickly hit the throttle and watch how it performs.
If the engine bogs, accelerates erratically and puts out a big cloud of blue smoke, the low-speed mixture is too rich. Turn the low-speed needle clockwise 1/8 turn to adjust it.
If the engine accelerates for a moment and then bogs, hesitates or stalls, the low-speed mixture is too lean; turn the screw counterclockwise 1/8 turn.
Adjust the mixture screws in 1/8-turn increments, wait 15 seconds and retest after each change. Set it for the best acceleration without the car stalling.
Care and maintenance of a nitro RC engine
When you’re done running for the day, drain the fuel tank. Then heat the glow plug with its igniter and try to restart the engine to burn off any fuel left inside it.
Repeat this until the engine won’t fire; try to clear out the residue while the engine is still warm.
Finally, put in a little corrosion-inhibiting oil and turn the engine over to spread the oil to all the moving parts. However, DO NOT put the oil into the carburetor, because it can make the internal seals deteriorate.
When you clean the outside of the RC engine, use WD-40. Don’t use gasoline or any solvents that could damage the silicone fuel line.
Cleaning a nitro engine’s air filter
When the air filter starts to get dirty, follow these steps.
Step 1: Clean the filter foam with fuel. Pour a little fuel into a small can and squeeze the foam in the fuel. When it looks cleaner, throw the fuel away.
Step 2: Dry the filter. Squeeze the fuel out with a paper towel until it’s dry.
Step 3: Apply the air filter oil treatment needed to help keep dirt out. Work the treatment through the whole filter: put the filter in a plastic bag, like a sandwich bag, and squeeze until the filter is saturated but not soaked.
Nitro engine troubleshooting
In this section you’ll find a selection of the most common problems you can run into while tuning a nitro RC engine. We’ve also included a list of possible fixes so you don’t run into trouble while running and tuning your new nitro RC engine.
Nitro RC engine glow plug problems
The glow plug in your engine is an inexpensive consumable that needs to be replaced regularly to keep peak performance and easy starting.
In most cases, any starting problem or erratic performance can be traced back to the glow plug.
The glow plug should also be checked if the engine’s acceleration and top speed suddenly drop off.
Testing the nitro engine’s glow plug
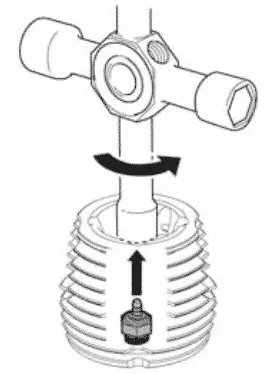
The only sure way to test for a bad glow plug is simply to install a new one and see whether the problem goes away.
Remove the glow plug from the top of the cylinder head with a 5/16 in wrench.
Make sure there’s no dirt or debris on top of the cylinder head that could fall into the engine. Don’t lose the copper gasket that seals the glow plug.
Touch the glow plug to the contact of the glow plug igniter. The whole coil should glow white.
Sometimes the first part of the filament doesn’t glow while the rest does; most likely it isn’t making full contact with the igniter.
If the glow is dark orange, the igniter’s battery needs to be replaced or recharged.
Flooded nitro engine
At some point you may accidentally flood the engine with fuel. Symptoms of a flooded nitro RC engine include hard starting and muffled sounds from the exhaust.
Remove the glow plug with a 5/16 in wrench, then remove the air filter. Turn the engine upside down to drain the extra fuel out of the combustion chamber and the carburetor.
Turn the vehicle back over and reinstall the glow plug. The engine should start and run normally.
Carburetor tuning changes from day to day
Carburetor tuning is the biggest variable you have to manage while running your RC engine. The fuel brand, the outside temperature and the humidity all affect how your carburetor should be set.
If the engine runs well one day but rough the next, it’s probably the result of a change in air quality and temperature. That’s to be expected, and you should adjust to the new conditions.
Nitro RC engine cooling problems
Engine overheating is usually caused by the engine being set too lean or by blocked airflow around the cylinder head. If the engine was set too lean, simply let it cool down, readjust and try again.
Bodies should have holes in them so air can flow over the surface of the cylinder head. On most bodies, it’s a good idea to cut out part of the windshield and part of the rear window for extra cooling.
That’s all. We hope this was useful, that you’ve been able to tune your nitro RC engine as well as possible, and that you’re already out enjoying your car. With patience and dedication, you’ll be able to make the changes you want and get the best performance your engine can give.
Keep an eye out for the upcoming guides we’ll publish, and if you’re still choosing a car, see which RC car to buy.
Related guides
RC cars
Practical Tips on RC Nitro Fuel
Why handling your RC nitro fuel correctly matters, along with our best tips.
4 min read
RC cars
How Does an RC Glow Plug Igniter Work and What Should You Know?
A glow plug igniter is one of the most important accessories for running nitro RC cars: it's what lets you start the engine.
4 min read
RC cars
Nitro RC Car Maintenance: Your After-Run Routine
What to do after every session with a nitro RC car: empty the tank, clean it, look after the air filter, protect the engine with after-run oil, and check the glow plug, clutch and drivetrain.
3 min read
RC boats
Gas and Nitro RC Boats: Pure Power on the Water
Everything you need to know about fuel-powered RC boats, plus how they compare with electric ones.
3 min read

RC aircraft
Gas RC Planes for Engine Lovers
We explain how a gas RC plane works, which one to choose and how to start flying one.
3 min read